Getting a working knowledge of how to process your digital images — whether in Photoshop, Lightroom, or some other imaging software — can be daunting. In Austin at the Ultimate Money-Making Photo Workshop a couple of weeks ago, we hosted several sessions dedicated to helping folks learn the basics of digital photo processing. And last Saturday we ran an article from Riley Caton on sorting your images in Lightroom. Today I’d like to share two basic digital photo processing steps you should put every one of your images through. Back when we were all shooting film, we knew that an image was not really an image until it went through the chemistry (or what was affectionately known as “the soup”) which turned the film into negatives (or slides). And then, from the negatives, we made prints. Now, with digital, we have instant feedback on our shots. But that doesn’t eliminate the need to “process” them, to make them the best they can be. As I said, you should process all your shots before you print them. Think of it as the “digital soup.” Photoshop offers automated adjustments, though I discourage you from using them. Instead, begin with these two straightforward adjustments for basic digital photo processing and you’ll immediately improve your photos and make them easier to sell.
**1) Digital Photo Processing Using “Levels” in Photoshop
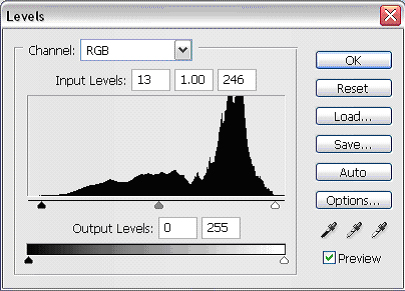
Levels will set the overall TONE of the image. Use the HISTOGRAM as a reference. To see the “Levels” histogram, click on “Image,” then “Adjustments,” then “Levels.”  The dark areas of your image are represented on the left of the histogram, and the white areas on the right. See the three arrows at the bottom of the graph… one black, one gray, and one white? You want your image to have some small areas of black and also white. To make sure it has those, all you need to do is click on the little triangles and drag them in until they meet the edge of the shaded areas, as shown above.
** 2) Digital Photo Processing Using “Curves” in Photoshop
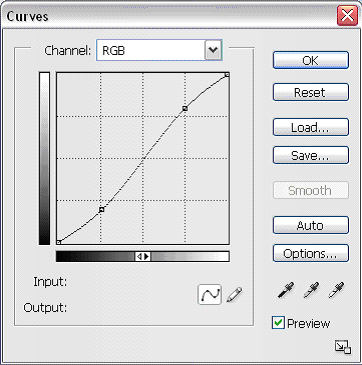
To find the “Curves” screen, first select “Layer,” then ” New Adjustment Layer,” and then “Curves.” With “Curves,” you will set the CONTRAST in your photos.  When you first open a “Curves” box, you’ll see a straight, diagonal line in the box. To increase the contrast in your photo, you can darken the shadow areas by dragging the line in the dark zone (lower left) down… and dragging the line in the white zone (upper right) up. Your diagonal line will now look like a slight “S.” As in this example, an S curve darkens shadows and opens highlights for a nice simple contrast adjustment. One thing I notice in images that have not been processed is that they look as though they have a slightly gray film over them. This tells me right away that these shots are right out of the camera and that no digital photo processing tools have been used to enhance them. Here are two examples from Austin to illustrate my point. See if you can see the “gray film” lift as I make these two adjustments I’ve just told you about: “Levels” and “Curves.”
  Right out of the camera — see how the image is “flat?”
  With slight “Levels” and “Curves” digital photo processing adjustments, the “gray film” has lifted. The image has more tone, contrast and even a bit more punch in the color. Another example:
 Here’s another before and after with nothing more than a “Levels” and a “Curves” digital photo processing adjustment done to each. I hope you are able to see with these two examples the vast difference simple digital photo processing can make. With these two quick-and-easy steps, you can transform an image from the basic shot you captured in camera to a processed, more fully developed image. One thing to keep in mind with all imaging software is that a little goes a long way. Always use a gentle hand with your image adjustments. [Editor’s Note: Learn more about how you can turn your pictures into cash in our free online newsletter The Right Way to Travel. Sign up here today and we’ll send you a new report, Selling Photos for Cash: A Quick-Start Guide, completely FREE.]
