See this cow… 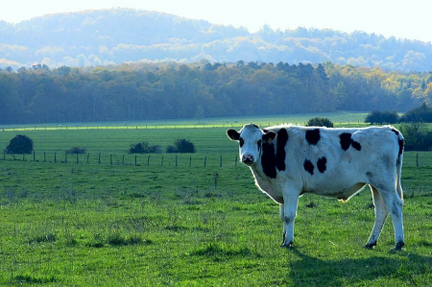 This is a picture that was submitted for this month’s photo challenge — Home Sweet Home — by one of your fellow readers. You might recall earlier this year we talked about how different light has different qualities. (Click HERE for a refresher). One of those qualities is the color cast or tone of the photo and that’s what’s amiss here with this blue (well, technically speaking it’s called cyan) cow. You’re limited in your ability to deal with this color cast/tone in your camera, but this is definitely something you can fix post-processing using color correction in Photoshop. Here’s how…
Photoshop Tip: Steps for Color Corrections
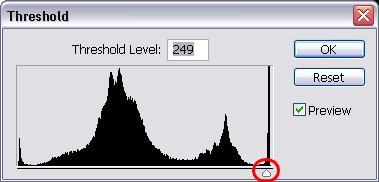
1. Open the file up in Photoshop. 2. Go to “Layer”… then, “New Adjustment Layer”… then, “Curves.” By the way, I renamed my Layer “color correction” so it’s easy to find later. On this screen, we are going to use the eye droppers (circled in red)… 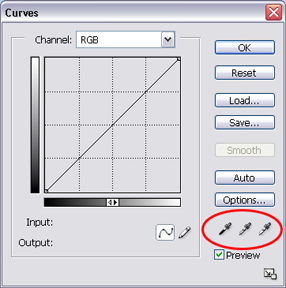 3. The trick now is finding the blackest black in your picture. You’re going to click on that black area with your little black eye dropper circled above. And each time you click on something black, the dropper will adjust the color of the photo. So peck around a little until you find the blackest black spot. Quick Photoshop Tip — If you can’t determine where your darkest blacks or whitest whites are (granted, it’s sometimes hard to tell) you can find them easily with a layer called “Threshold.” You can access this layer by clicking on the fourth button from the left on the very bottom of your layers pallet (see below… circled in red.). It’s a circle with black on top and white on the bottom. And it’ll look like this when you open it…
 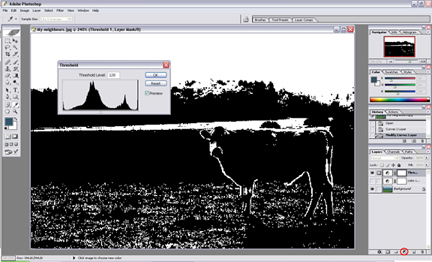 Now use the little slider and slide it all the way to the left — you will see everything start to disappear. Then slide it just slightly back till you see a few black specks (enough for you to get your eye dropper onto.)
 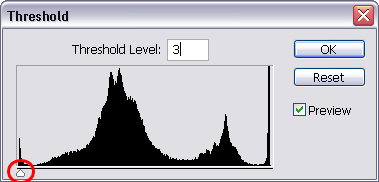 Do the same to the right. This is now showing you the white areas. Be careful that you actually get a white spot and not a blown highlight. Sometimes you have to go a little bit farther in to find it.
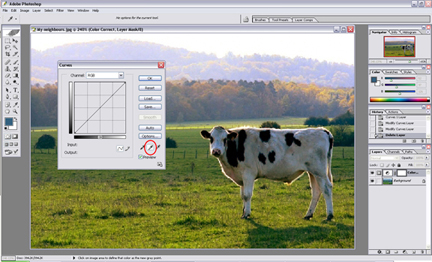
  This is a great image for this example because it is not “clipped” on either side (meaning there is detail in all the blacks and detail in all the whites.) So now that you’ve made a mental note of where the blackest of blacks and the whitest of whites are, you can simply exit from the Threshold layer. There is no need to save it — it’s just for your information. 4. Now that you know where your blackest of blacks and your whitest of whites are — go back to the curves layer (remember that I named mine “color correction”). Use the black eye dropper and click your black spot. Then use the white eye dropper and click the white spot. When I did this with this cow picture, I hit a few snags (as you’ll often do when you’re adjusting the color of your photos because color correction in Photoshop can be tricky)… When I clicked on my blackest black spot with my black eyedropper, there were only subtle changes. And when I clicked on my whitest white with my white eyedropper, things started to go wild because the side of the cow facing us is in shadow (and isn’t exactly white). So when this happens, you have to use that middle eye dropper (circled in red on the screen shot below). Just like the black and white eyedroppers, this one is for “middle gray” and your job is to find a nice middle gray spot on the cow. I clicked around a little until I found a spot that gave me the color casts for the photo that I liked (without loosing the hills in the background — be sure you’re watching all the elements in your picture and not just your subject). And here’s what we have…
  5. As a final step, because the color correction in Photoshop added a bit more contrast than I wanted, I changed the layer from “normal” to “color” (see the red circle below for where to change this… )
 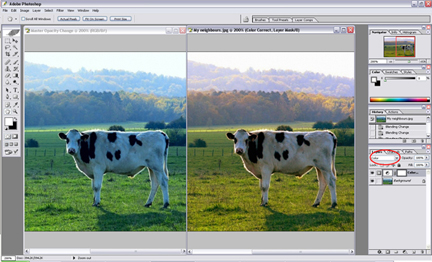 And we went from the original blue cow to this warm light cow in a few short steps. WARNING: Not all color correction changes you make in Photoshop are for the better. Part of being a photographer is personal taste, so play around and see what works for you. Click here to learn about our upcoming events. [Editor’s Note: Learn more about how you can turn your pictures into cash in our free online newsletter The Right Way to Travel. Sign up here today and we’ll send you a new report, Selling Photos for Cash: A Quick-Start Guide, completely FREE.]
