Learning digital photography is a bit like learning both a language and a musical instrument at the same time. Not only are you trying to understand your camera’s various dials and buttons, you’re also trying to decipher “photographer speak.”
Crack open any camera manual and you’ll be met with a barrage of photography terms and phrases that mean very little if you’re just starting out. Without any context for this lingo, it can make learning digital photography daunting.
With that in mind, we put together this ultimate glossary of photography terms for beginners. While there’s a lot of photography jargon out there, we’ve narrowed it down to just the essentials. Here are 25 photography terms and expressions every beginner should know…
25 Photography Terms Every Beginner Needs to Know
Speaking “Photographer” – the Basics
1. Exposure: The quantity of light reaching the camera’s digital sensor. Exposure is determined by aperture, shutter speed, and ISO (explained below). Together, these three variables are called the “exposure triangle.” An image can be brightened or darkened by adjusting any one of the three variables (or a combination of them). If an image is “underexposed,” that means it’s too dark, and if an image is “overexposed,” that means it’s too light.
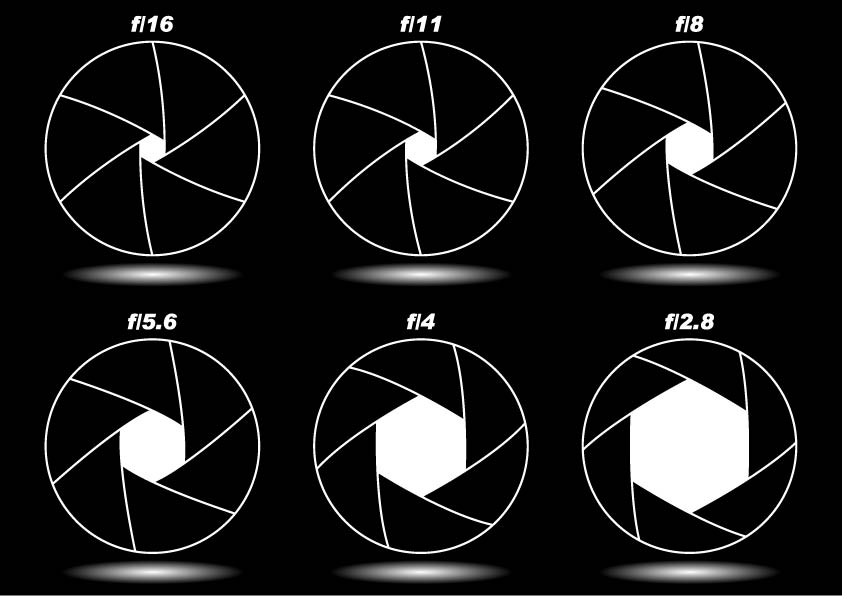
2. Aperture: The adjustable opening in the lens that lets light into the camera. Just like pupils in the human eye, the aperture can adjust to let in more or less light based on how bright the scene is. Aperture is measured in f-stops. Large aperture openings have low f-stop numbers such as f/2.8 and f/4. Conversely, small aperture openings are expressed with high f-stop numbers such as f/11 and f/16. Aperture also affects the depth of field in an image. (See diagram below.)

3. Shutter Speed: The part of the camera that opens and closes to let light reach the digital sensor for a certain amount of time. Shutter speed is typically measured in seconds and fractions of a second. The longer (slower) the shutter speed, the more light that reaches the digital sensor. Fast shutter speeds such as 1/500th of a second, will let in less light. Shutter speed also affects how motion looks in a photo. Slow shutter speeds will blur motion while fast shutter speeds will freeze it.
4. ISO: ISO is a measure of the sensitivity of the camera’s sensor to light. High ISO numbers, such as ISO 3200, will create a brighter image compared to lower ISO numbers, such as ISO 100. ISO is one of the three ways to lighten or darken the exposure of an image. However, using high ISO settings will also create digital noise that looks like small grains of sand across the photo. For this reason, the rule of thumb is to use a low ISO setting when possible, and only raise it when a brighter exposure is needed. It’s always best to adjust exposure using aperture and shutter speed first when possible. (But don’t be afraid to raise ISO when needed.)
5. Depth of Field: The range of sharpness from front to back in an image. An image with “deep” or “large” depth of field means that the entire photo looks sharp from front to back. Landscape photos often have a deep depth of field. A photo with “shallow” or ‘small’ depth of field means that only a portion of the photo is sharp, and there is a smooth softness toward either the front or the back (or both). A portrait with a soft background behind the subject would be an example of shallow depth of field. An image will always be sharpest at the place where the camera focused, and depth of field extends out from that point. One of the things that determines depth of field is the aperture that is chosen. Low aperture numbers such as f/2.8 or f/4 create a shallow depth of field, while high aperture numbers such as f/11 or f/16 produce a deep depth of field, comparatively.
6. Focal Length: This term is used to describe different types of lenses, and it is expressed as millimeters.
7. Telephoto Lens: A lens with a longer focal length, typically in the 70mm and higher range. Telephoto lenses give a narrower field of view and also magnify objects within the frame. Just like binoculars, subjects that are far away will appear closer with a telephoto lens.
8. Wide Angle Lens: A lens with a shorter focal length, commonly 10mm-40mm. These types of lenses provide a wider field of view and also expand distance from front to back. This means that a distant mountain range, buildings, etc. taken with a wide angle lens will appear far away and small in the frame.
Common Camera Settings
9. Burst Mode: A setting on your camera that will fire off multiple, continuous shots as long as the shutter button is pressed. This setting is usually found in the same place as the self-timer setting in most camera menus. One of your camera’s outside dials may also be a quick way to set burst mode shooting. Burst mode is especially useful when shooting sports or other fast-moving action. It increases the odds of capturing just the right composition.
10. Exposure Compensation: A setting that lets you easily lighten or darken the exposure. It is usually indicated with a plus/minus button on the outside of a camera. It may also be located in your camera’s “quick menu”. Choosing positive exposure compensation means your image will be brighter, while choosing negative exposure compensation means your image will be darker. If you use exposure compensation, be sure to return it back to zero when you’re done as your camera will remember the last setting used.

11. White Balance: Every light source, whether it’s a light bulb or the sun has a color cast. White balance is a setting that allows your camera to adjust for the color of light as needed. The idea is that a white t-shirt or piece of paper should look white under any light source. White balance is your camera’s way of making sure that white looks white and that there is no strange color cast in the image. White balance is also a way to warm up or cool down an image for creative effect. For example, you may choose to warm up a sunset image by choosing a white balance that will add a bit of yellow.
Lighting and Portrait Photography Terms
12. Soft Light: This refers to a quality of light in which there are no harsh shadows and the light is diffused and evenly illuminating the scene. Soft light occurs naturally on cloudy days or under the shade of a tree or building. This type of light is great for portraits.
13. Hard Light: This refers to bright, direct light that casts strong shadows. A classic example of this type of light is the sun at high noon.
14. Diffuser: Anything that is used to soften and even out the quality of light hitting the subject. Diffusers are typically white fabric attached to a frame that can often be folded or collapsed for storage or travel. Diffusers are commonly used for portraits, still life, and macro (close-up) photography. They are simply held between the light source and the subject to soften the light.
15. Contrast: This refers to the difference between light and dark in an image. For example, a photo with high contrast would have both very bright and very dark tones within the same scene.
16. Catch Lights: In portrait photography, this refers to the small highlights visible in someone’s eyes when light is being reflected onto their face. Most portraits look better if catch lights are visible in the subject’s eyes because it helps their eyes sparkle and look lively.
17. Polarizer: A special filter that can be added to the front of a lens to reduce glare. Polarizers work best on taking the shine off of anything reflective such as wet foliage, rocks, concrete, water, and buildings. Polarizing filters are a staple for landscape photographers.
Slang and Photography Jargon
18. Aspect Ratio: The ratio of height to width in an image. For example, most cameras shoot a 2:3 aspect ratio. Some cameras can be set to shoot different aspect ratios as needed such as 1:1 (square) or 16:9. Aspect ratio primarily comes into play when dealing with presenting or printing images. For example, a standard print/frame size is 8×10 inches, but that is not the 2:3 aspect ratio that most cameras shoot. This means that a photo shot at the typical 2:3 aspect ratio will need to be cropped to fit in an 8×10 frame. It’s good to be aware of aspect ratio, especially when considering the final presentation of an image.
19. Prime vs Zoom Lenses: A prime lens means that it is a fixed focal length lens. For example, one of the most common prime lenses is the 50mm. Prime lenses are known for excellent optical clarity and often have apertures that can open very wide (such as f/1.4). A zoom lens is a lens that offers a range of focal lengths usually by turning a ring on the outside of the lens. Zoom lenses are very convenient, but are often not quite as sharp as prime lenses.
20. Digital Vs. Optical: These terms are usually used in reference to zoom lenses. Digital zoom means that the magnification (zooming in) effect is achieved through the camera’s internal software, essentially cropping away pixels, while optical zoom means it’s created with physical parts moving within the lens. Optical will always give better image quality than digital.
21. HDR: Stands for High Dynamic Range. HDR is both a setting on some cameras and also a post-processing technique for dealing with high contrast scenes. The idea with HDR is to combine two or more images taken at different exposures into one final image. For example, in a landscape photograph, one image would be taken with the foreground properly exposed, and another image would be taken with the sky properly exposed. These images would then be combined (either with HDR mode in-camera or later through post-processing software). HDR is used when, due to high contrast, it’s impossible to get a proper exposure for both the light and dark values of a scene in a single image.
22. Blown Out: This term refers to times when an image is so bright that it is losing detail in the highlights or bright parts of the image. It is usually caused by an image being overexposed.
23. Normal Lens: This refers to a 50mm lens because that is the focal length that most closely approximates the human eye, so it is called a “normal” lens.
24. Golden Hour: The time of day during sunrise and sunset when the light turns a beautiful golden color. Golden hour usually begins approximately 30 minutes before/after sunrise and sunset, depending on your latitude and the time of year. This is a great opportunity for both landscape and people photography.
25. Bokeh: Describes backgrounds that look soft and smoothed, like an even blur. It is created by using a wide aperture opening (low f/stop number such as f/2.8). The classic bokeh look is when points of light become beautiful out of focus orbs in the background.

We hope this glossary of photographic terms has been helpful!
Understanding these 25 important photography terms will provide a solid foundation to continue building your photography knowledge into the future.
Although learning these 25 basic photography terms for beginners is a great start, now it’s time to put all this theory into practice… so grab your camera and get out there!
[Editor’s Note: Learn more about how you can fund your travels and make an extra income with photography in our free online newsletter The Right Way to Travel. Sign up here today and we’ll send you a new report, Profit from Your Photos: A Quick-Start Guide, completely FREE.]

