One of the biggest problems travel photographers (and well, all photographers for that matter) face, is photo lighting and having to correct over-exposed photos. When you’re on an assignment and you have just two days to bring back an article with photographs of a place, you have to deal with whatever light God gives you on those two days. You can get up early and you can shoot again in the evening or at night — but sometimes you’ll only have time to get to a place once. Parades are often held mid-day. Certain parks and historic areas don’t allow admission before noon. Sometimes you stumble upon a story/photo opportunity while you’re out exploring. Maybe you can come back, maybe you can’t. My point is: Working with natural light is always a challenge. As a speaker at AWAI’s photography workshops and as an “inspector” at Istockphoto.com, I see a lot of really great pictures ruined by poor lighting. Here’s an example… 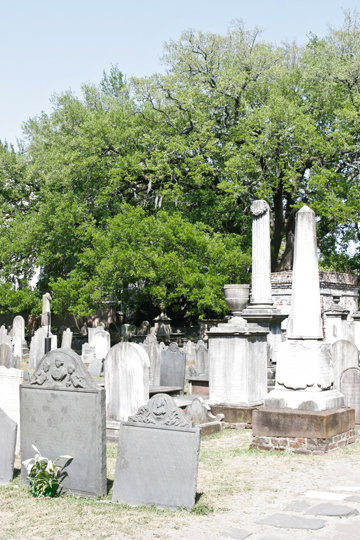 This is an over-exposed picture — probably shot in the noonday sun. See the hard-edged shadows… the loss of detail in the foreground… and the flat, washed-out, lighter areas of the image? These are all signs of an over-exposed shot. Here’s another example of an over-exposed picture…
 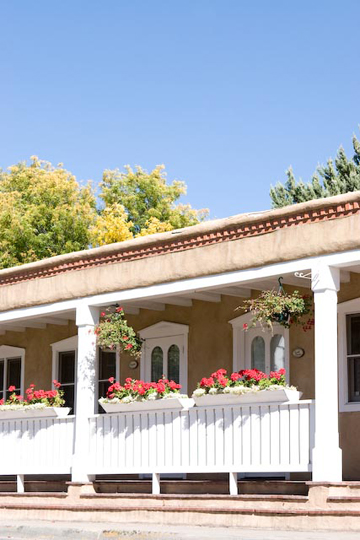 See how the overall image looks washed out? The white railing areas are nothing but pure white with no detail (look to the far left of the picture and you’ll see that the white lines of the fence have been lost completely). Pictures that are over-exposed are not good. You want your colors to be saturated, not faded. And your white areas should still hold some detail. Now, as I told this photographer, the way to avoid this altogether is to look at the histogram or blinking highlights in your camera as you’re taking the picture. That would clearly show the railing — as well as the rest of the image — as overexposed. And in that case, you could compensate on the spot, by adjusting your camera’s settings. But in this case, the photo has been shot. The moment is gone. And the damage is done. The good news is, however, that you can sometimes correct over-exposed photos in Photoshop. (I should tell you, though: It’s easier to fix slightly underexposed images than it is to fix overexposed ones.) Nevertheless, I was able to fiddle with this image. Let me show you what I did to fix it:
Fixing An Over-exposed Picture:
First, I opened the over-exposed image in Photoshop and made a duplicate layer (right click on the background image and choose “duplicate layer”). On the “layers” pallet, I chose “multiply” and then dropped the opacity to 62%. There is no hard and fast rule here. I chose 62% because it just looked right to me. You can see that the colors are already more saturated. 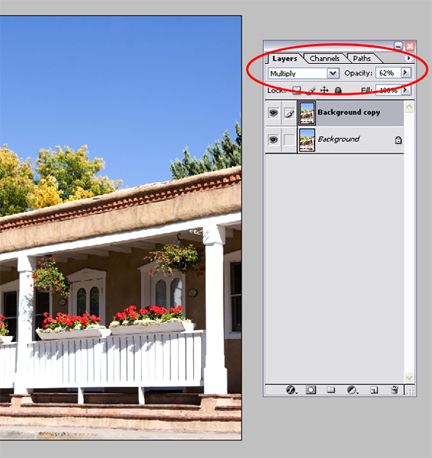 But since I wanted to correct as much of the overexposed area as I could without exaggerating the contrast, I put a filter on the layer.
 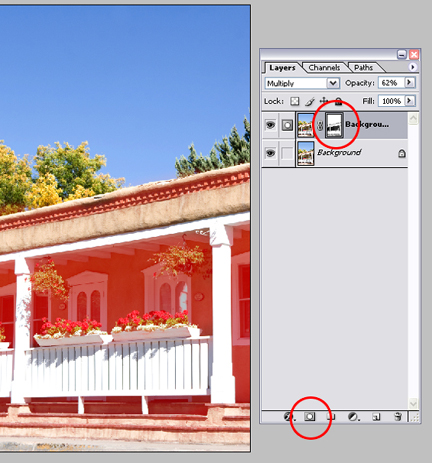 You can put a filter onto any layer (except the background) by clicking on the filter icon at the bottom of the pallet (see the lower red circle). Then, I used the brush tool to paint in the darker shadow areas with black on the filter layer. When you do this, make sure your filter layer is selected and it will show up red, as in the image here. This red area is called a “mask.” Next, I added a level adjustment layer by clicking on the “layers” menu at the top of the screen, hovering the mouse over “new adjustment layer,” and choosing “levels.” (A box appears, asking you to name the layer. Just click “ok.”)
 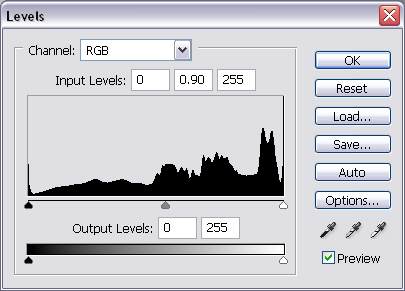 Since the image we are correcting is over exposed, you can see a solid black line to the right of the histogram in the image here, representing the white in the image. In this case, I lightened up the midsection (the medium shades in the photo) just slightly, by dragging the middle of the three arrows under the histogram to the right a bit. I also went for a very minor “curves” adjustment just to brighten the image and give it a little bit of pop. You can do this by going to the “image” menu at the top of the screen, hovering over “adjustment,” and choosing “curves.”
 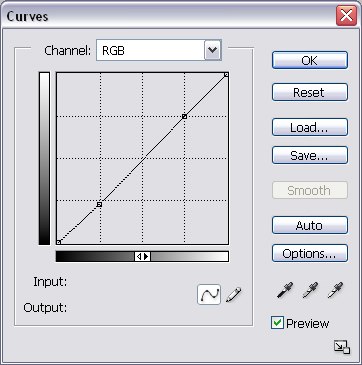 Notice I did not increase the white area — I only adjusted the dark side slightly. Play around with this feature until the lighting of the photo looks right to you. And finally, here is the same photo, before and after:
 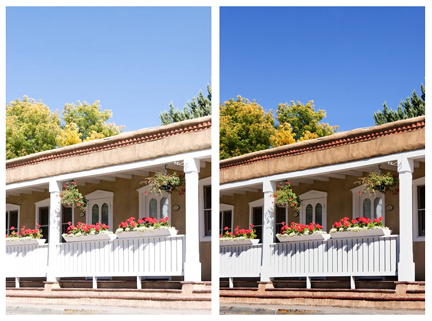 The colors have more saturation, we have saved the detail in the shadow area, and we have given the impression that the white railing is not totally blown out. Now, overexposure is hard to deal with and this “fix” is far from perfect. You can’t bring back details and colors that your camera never captured in the first place. That’s why it’s so important to learn about photo lighting techniques — so you can get a good shot the first time. If, however, all else fails and your calculations are only a tad off, try Photoshop — like I just did. It might just save an otherwise useless image. Remember, fixing one or two bad habits can make a big difference in the quality of your photos. Really, it can make or break your chances of selling them to editors. [Editor’s Note: Learn more about how you can turn your pictures into cash in our free online newsletter The Right Way to Travel. Sign up here today and we’ll send you a new report, Selling Photos for Cash: A Quick-Start Guide, completely FREE.]
