Back when I was shooting with studio lights, my living room would go for days (ok, weeks…) cluttered with light stands, cords, a background, reflectors, and a stool.
Anyone who came through the front door had to run the gauntlet, risking the possibility that I’d make them sit for a few quick shots.
Here’s a photo I took of a friend while I was learning to use my studio lights (no, she didn’t show up at my house like this):

Studio lights are fun, but I sold mine. Natural light takes a lot less setup… doesn’t take over my living room… it’s FREE… and the results can be stunning.
There’s something gritty and honest about using natural light in photography, too. And when you know what you’re looking for, it’s incredibly easy to manipulate it to make your subject look gorgeous.
In this case, I found a spot where light was reflecting off a wall to the right of my subject—making her eyes sparkle. No need for a reflector.

And here, I simply found a great place in the shade where the whole open sky reflected into her eyes, creating that same sparkle:
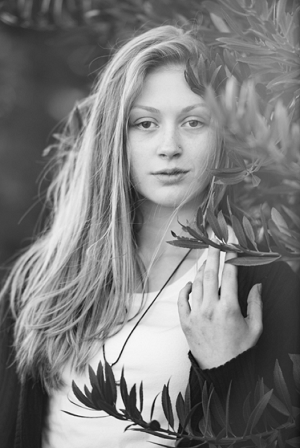
So simple!
I’ve also taken super simple stock photos of objects in nothing but natural light, beside a window. Here’s my set-up…
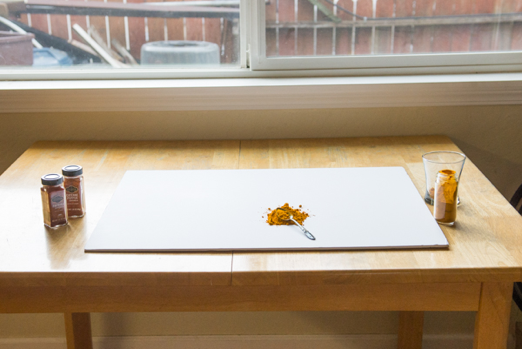
It led to this stock photo, which sells in my agencies…

Authentic, natural light is in! And if you’re strapped for cash, that’s great news because it’s free!
As long as you’ve got daylight, you can take gorgeous photos of people or things.
To make them look amazing, here are two things you should know how to do with light:
Reflect it. People almost never look good in direct light. Whether it’s from the flash on your camera, a studio strobe, or the sun, you need to get your subject OUT of the direct light. Try putting your subject in the shade, across from a building that’s reflecting light back onto their face. Or use a reflector to pop some light onto their face and get that sparkle in the eyes.
Diffuse it. If you don’t have any open shade nearby where you can get your subject out of direct sunlight, or if you’re shooting with a flash, try diffusing the light. That means that your main light source passes through something like an umbrella, a soft box, or a screen that you hold up to the sun, which softens it before it hits your subject. Cloudy days are great for this as the entire sky turns into a big soft box for the sun.
BONUS: Diffuse + Reflect. The best conditions for shooting are on an overcast day when the sunlight is diffused by the clouds. Then, use a reflector to add a little extra light under the eyebrows, nose, and chin, and get that all-important “sparkle” in the eyes.
If it sounds complicated, I assure you, it’s not. As soon as you see someone demonstrate how it works, it’ll click.
So grab a friend and go outside to experiment with different kinds of light and see what you get. You can buy any number of fancy reflectors in different variations of size, color, and shine… but my very favorite tool by far is just a piece of white foam-core board from the arts and crafts store for $2.
It’s light, it’s easy to hold up while you shoot, and the results are marvelous.
[Editor’s Note: Learn more about how you can fund your travels and make an extra income with photography, travel writing, blogging, and more in our free online newsletter The Right Way to Travel. Sign up here today and we’ll send you a new report, Five Fun Ways To Get Paid To Travel: A Quick-Start Guide, completely FREE.]
