If you have a bunch of photos that you love but have never used for anything, you’ll probably like this next photo project I want to tell you about… Photos + wood or canvas = great Christmas gift. Here are a few I created by “transferring” my images onto wood or canvas to create a distressed look.  What you need:
- Photocopy prints of your photos – $0.15 to $1 per print
- Canvas or wood – $2-$15 each at a craft or home improvement store
- Glossy gel medium – $16 at craft store
- Mod Podge in gloss or matte – $8 at craft store
- Foam brushes – $1 at craft store
- Rags – $0 from your closet
Hooray! All those photos that weren’t “technically perfect” enough to submit to a stock agency? You can use them for this! Even phone photos can work. Part of what makes these look great in the end is the little imperfections in them. So you don’t need to start with a perfect photo. Pick something that will look good on a wall. 2. Choose your sizes. Because you need to have these printed out on a conventional copy machine (ask the guy behind the counter if the machine doesn’t have a USB slot), you’re likely limited to the dimensions of paper a copy machine will hold. That’s 8.5”x11” or 11”x17”.  You can have a wood block cut to those sizes or smaller for cheap at your local home improvement store… or you can find canvas or wood at the craft store. Try these sizes: Square – 8”x8” or 10”x10” Rectangular – 8”x10” or 10”x14” 3. Get your photos printed. To make the image transfer correctly, you need to have your photos printed on a color copy machine, using regular white copier paper.
  This won’t work with your photo printer at home. I tried it. No good. Here’s the result:
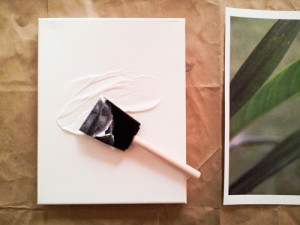
  4. Gel it and stick it. Prep your workspace with some newspaper or, as I did, with a brown paper bag. It’s gonna get messy.
  With a foam paintbrush, paint a semi-thick layer of gel medium on the surface of the canvas or wood. Smooth it out nice and evenly, like mayo on a ham sandwich or peanut butter on toast.
  Then, with a wet rag or sponge, gently blot the front surface of your photo print.
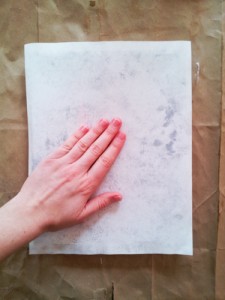
  Turn the print face down, line it up, and lay it gently on top of the gel.
  5. Smooth it out. Next, with your fingers, smooth out any air bubbles in the paper and make sure that the entire surface of your print is making contact with the gel underneath. Pay extra attention to corners. Any areas that the gel doesn’t touch will not transfer.
  6. Let it dry Wait for your print to dry overnight.
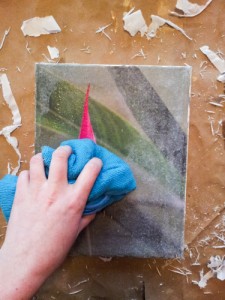
  7. Peel up the paper. Ok, it’s time. Lay a wet cloth on top of your print, getting it nice and soaked.
  When you lift the cloth, you should be able to see the print showing through underneath. Now, gently rub the drenched paper in one spot until it starts to come off. Continue rubbing the paper off of the entire print.
  8. Repeat. Once you’ve removed the top layer of paper, let it dry. You’ll notice that it’s kind of fuzzy. That’s leftover paper residue. I like to blot it with a rag and continue gently rubbing until the paper rolls up under my fingers like eraser dust. You may have to do this two or three times to get it all.
 At this point, you may notice that some of the print rubs off, too. That’s ok. Actually, that’s kind of the point to get that “distressed” look. 9. Seal and finish. Once you’ve removed all the paper you can, and your piece is dry, paint a layer of Mod Podge over the top to seal it and add a glossy finish. Let that dry and go for another layer.
  Here’s the end result, hanging on my yellow wall:
  Here’s my favorite one so far:
  And here’s one on wood:
  Tips:
Tips:
- Before you print, punch up the contrast and saturation in your photos so that they look good printed out on paper
- When you transfer, your photo will end up backwards. So make sure you flip any photos horizontally that have words in them or don’t look good backwards.
- Make sure to wash out your brush between uses, so you can use it multiple times.
- Get creative and embellish the end result with charcoal, pastels, wax, paint, chalk, or anything you’d like to add.
This is so fun and inexpensive… and the result looks like a high-priced item you’d buy in a nice boutique downtown. Depending on how many I give away this year, I might try selling some online. New income source — yeah! Share on Facebook
[Editor’s Note: Learn more about how you can turn your pictures into cash in our free online newsletter The Right Way to Travel. Sign up here today and we’ll send you a new report, Selling Photos for Cash: A Quick-Start Guide, completely FREE.]

