
Noise can ruin an otherwise potentially awesome stock photo. We talked about avoiding noise a few weeks ago here.
Fortunately, noise reduction is an area where Lightroom truly shines.
Here’s an example of a noisy photo taken with a high ISO:

You probably won’t notice the noise until you zoom in. Here’s a portion of the above photo, blown up to 100%:

Ah-hah. There it is.
See all that grainy texture in the sky? That’s noise. It would be a problem for stock, but luckily there’s an easy fix.
In Lightroom’s Develop Module, on the right hand side, open up the “Detail” panel. You’ll see the Luminance slider under Noise Reduction. This is going to be where the magic happens. Gradually pull that slider to the right and watch as the noise disappears!
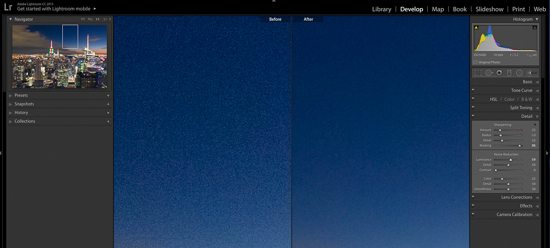
Here’s a screenshot of the same photo, before and after the noise reduction:
You’ll know you’ve gone too far if your photo starts to take on a smooth, covered-in-plastic look. Fixing noise is a balance between blurring out the grain, while maintaining detail in the important parts of your image.
It only takes a second to fix a noisy photo. So next time you’re photographing in low light conditions, don’t be afraid to raise up your ISO, and give this a try.
Editor’s Note: Learn more about getting started selling your photos online in stock agencies – no matter how much or little photography experience you have – in the Breakfast Stock Club e-newsletter. It’s once a week, and it’s free to join, here.